Greetings, cloud enthusiasts! In this post, we’ll explore how to build an image recognition system using Google Cloud Platform. Hang on to your hat, this will be fun!
Case Study
Imagine we’re working on an app called Nice-Bicycle-Share-App, an exciting new platform for bicyclists. One of the main features of the app allows users to share photos of their bicycles with other users. However, some users are uploading images that aren’t bicycles, which is significantly degrading the user experience. To address this, we need to implement a system that ensures only bicycle images are uploaded.
If you prefer to see this post in video format, please refer to my video in Youtube (link: https://youtu.be/AmUv3r0o0ew?si=GHZoJB87sQpSw084).
Design
To illustrate this, refer to the mockup below in Picture No. 1. When a user tries to upload an image, our system will automatically recognize the content of the image and either block or allow the upload based on whether a bicycle is detected.

Requirements
In addition to the functional requirements outlined earlier, we have the following technical requirements:
- Highly-scalable,
- Easy to maintain,
- Flexible,
- Secure,
- Clear separate responsibility between services,
- Require minimum ML knowledge, and
- Using Google Cloud (see the title 😊)
Addressing the Requirements
To identify the images, we can use Vision AI. This managed and serverless service can interpret and analyze images without requiring any ML expertise from your part. It can be directly accessed via an SDK or API.
We chose an event-driven architecture because it ensures scalability and flexibility. For this, we need a reliable messaging service, and Pub/Sub is an excellent option. It is a fully managed service capable of processing more than millions of messages per second.
Given that the image identification process is straightforward with Vision AI, Cloud Functions is a suitable choice. This is a simple but powerful computing service which allows developers to run code in response to events without the need to manage or provision servers.
To ensure all components are securely managed, we will utilize Cloud IAM. This service provides fine-grained access control and visibility for managing permissions on resources, eliminating the need to share passwords or private keys to our engineers.
System Design
The proposed system design, which addresses all the requirements, is presented in Picture No. 2. It uses an event-driven architecture centered around Pub/Sub. To fully implement the image uploading and recognition system, we need at least two services: the User-Service and the AI-Service. Ideally, these services should be managed by different teams.
Since the teams managing these services do not communicate directly, the services are decoupled, promoting fault tolerance and scalability. Additionally, if a new service needs to respond to the event of a user uploading an image, there is no need for the existing services to change their code. The new service can simply subscribe to the relevant topics in Pub/Sub.
Unlike the AI-Service, the User-Service runs on Cloud Run due to its complexity, which includes handling registration, authorization, and various user flows. The User-Service also utilizes Firestore to store relevant user data. Firestore is selected because it is a fully managed, serverless database that requires minimal management from developers.
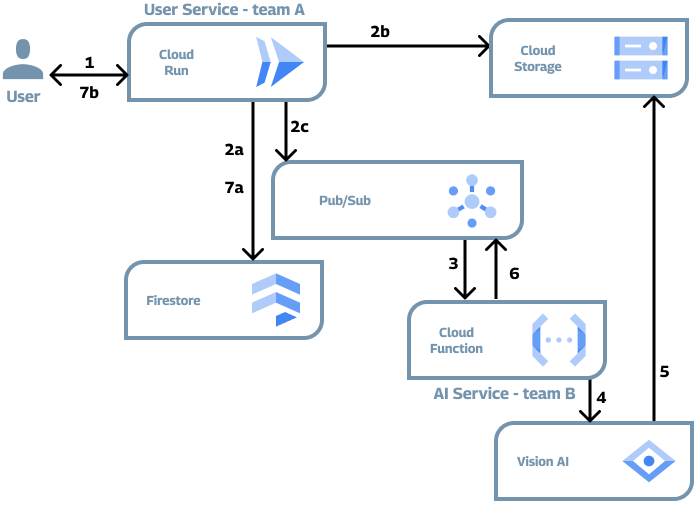
Regarding our main challenge of image recognition flow, there are 7 steps in the process, as shown in the Picture no 2. Here is an explanation of each step:
- 1: User uploads the image.
- 2: User-Service receives the image, and performs the following actions:
- 2a: Creates a new entry in the database.
- 2b. Uploads the image to Cloud Storage using signed URLs.
- 2c. Publishes
new-imageevent message to Pub/Sub, containing the ID and the path of the image.
- 3: AI-Service receives the event message.
- 4: AI-Service calls the Vision AI with the path from the message.
- 5: Vision AI retrieves the image directly from Cloud Storage, analyzes it, and returns the labels to the caller.
- 6: AI-Service publishes
image-labeledevent message to Pub/Sub, containing the labels from Vision AI. - 7: User-Service receives the event message, performs the following actions:
- 7a. Keeps the labels in database.
- 7b. Returns an appropriate response to the user.
The scope of this tutorial is to create steps from no 3 until no 6.
Tutorial
Now, let’s dive in and get our hands dirty! Instead of just reading along, I encourage you to follow these steps in a new window. By actively participating, you’ll keep the skills much longer. If you don’t have a Google Cloud account, you can sign up and receive $300 in free credits.
If you don’t receive the free credits, don’t worry! Google offers generous free usage limits on many of their services. For instance, you get 10 GB of message ingestion or delivery per month for free with Pub/Sub. Additionally, Cloud Functions provides 2 million monthly invocations at no cost. This means you can experiment and build without the fear of breaking your bank account.
Project
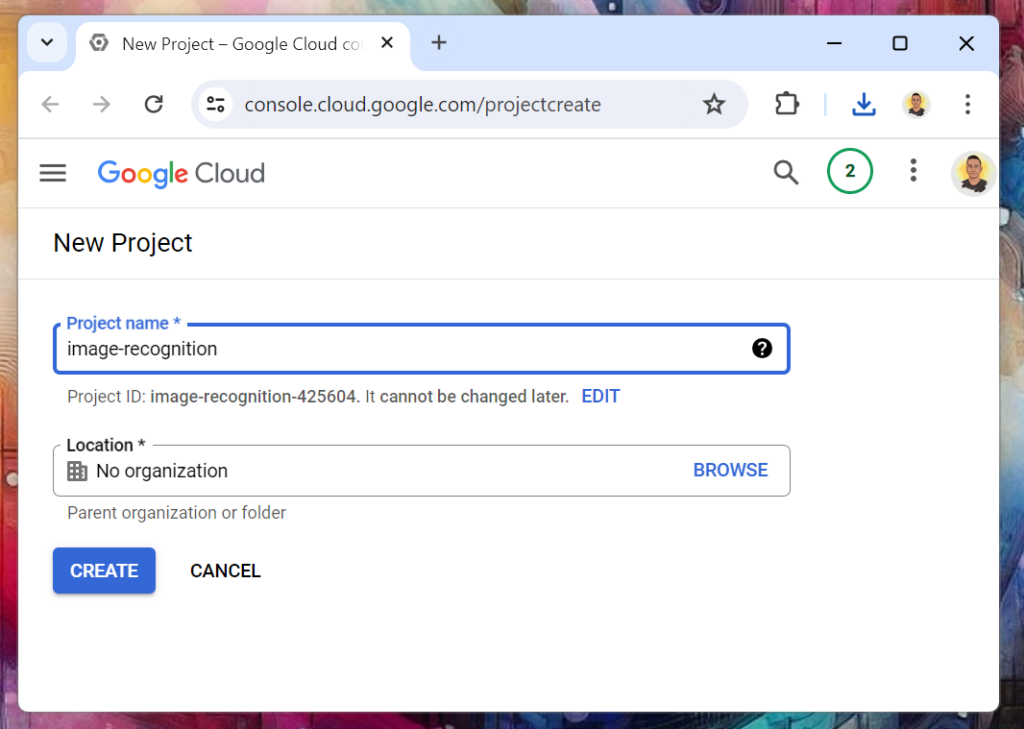
Create a new project in this link as shown in Picture no 3. It’s recommended to create a new project to easily manage resources and costs. If you prefer to use an existing project, that’s perfectly fine too. After creating the project, ensure you are using it for the following steps, as the console may revert to the previously active project. Make sure billing is enabled for your project to ensure access to all necessary Google Cloud services.
Service Account
The next step in our preparation phase is to create a new service account (click here). A service account is a special type of Google account used by applications and virtual machines (VMs) to authenticate and access the Google Cloud services securely . This is our ‘secret ingredient’ to eliminate the need for password-sharing in our system.
- Put
ai-service-sain the name of the service account. - Let service account id automatically filled.
- Put relevant description if you like.
- Click “Create and Continue”.
- Add these roles to the service account:
- Pub/Sub Subscriber,
- Pub/Sub Publisher, and
- Storage Object Viewer.
- Click “Continue” and skip the rest of the form and click “Done”.
Pub/Sub
Navigate to the Pub/Sub page (click here) and enable the API if it isn’t already enabled. Create two new topics with the IDs user-service-new-image and ai-service-image-labeled, leave the other options as default.
A default subscription will be created for each topic. Our AI-Service will subscribe to the user-service-new-image topic to receive events whenever an image is uploaded. It will actually create a new subscription when we create the service in Cloud Functions. Additionally, it will publish messages to the ai-service-image-labeled topic once it has labeled an image.
Cloud Vision
Now we need to enable the Cloud Vision just by visiting the Cloud Vision Page and click “Enable” button. This will allow this API to be used throughout the project.
Cloud Storage
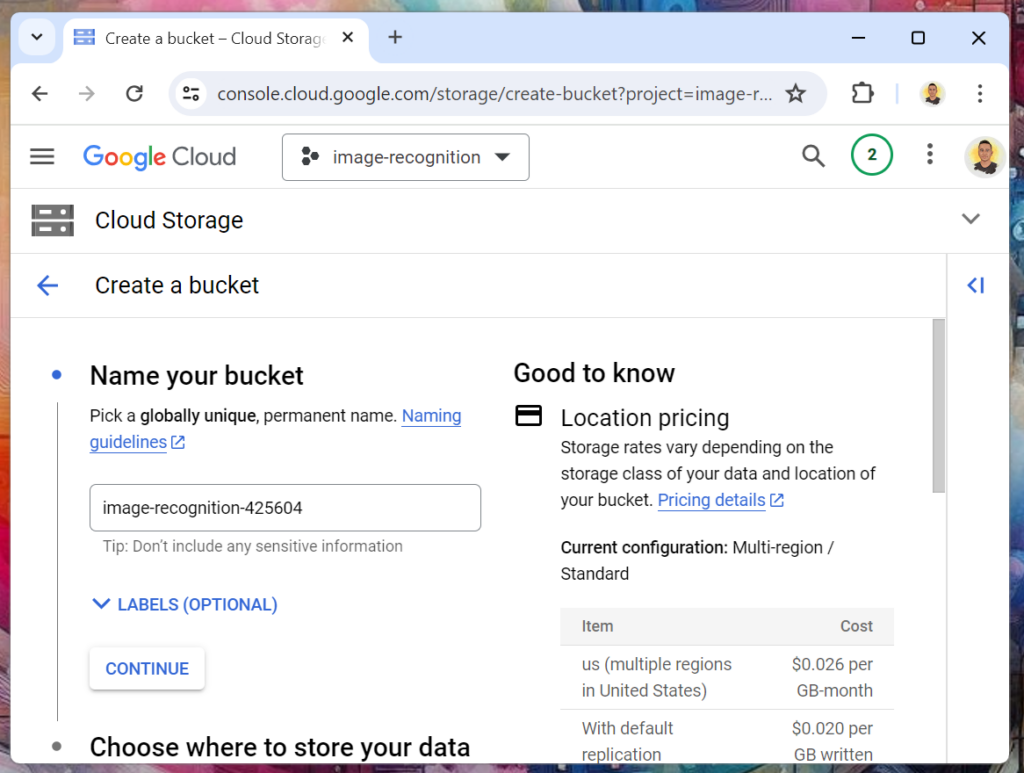
Now we need to create a bucket to store images uploaded by our users. Think of a bucket like a folder to keep your files. You can create the bucket on this page. The bucket name should be globally unique, as shown in Picture No. 4.
After choosing a name, we should choose the location of our bucket. For now, let’s choose the “Region” option and select the region closest to you. In production, you may want to choose the “Multi-region” or “Dual-region” option closest to your users since it will provide the best performance and availability.
In the next step, you will be asked to choose a storage class. Choose “Standard” as it is the most suitable for our use case. Keep the other options as default for now. On this page, you can also review the cost before moving one. Create the bucket and wait until the process is finished.
Cloud Functions
Now let’s get to Cloud Functions creation in this page. Follow steps below:
Configuration
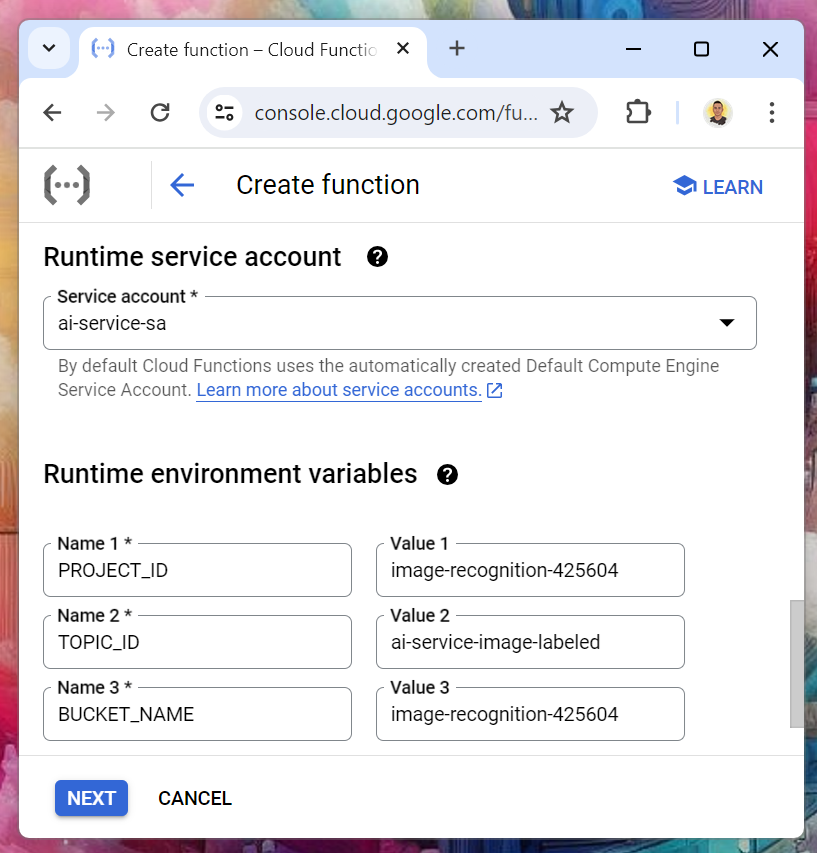
- Put
ai-service-image-labelingin the name. - Choose any region that you like.
- Change the trigger to Pub/Sub and select
user-service-new-imagetopic. - Grant the permission required if asked.
- In the runtime section:
- Select the service account that we created earlier,
ai-service-sa. This will make sure, our service can access Vision AI and Pub/Sub. - Add 3 variables with these values:
- PROJECT_ID=[YOUR PROJECT ID]
- TOPIC_ID=ai-service-image-labelized
- BUCKET_NAME=[YOUR BUCKET NAME]
- Select the service account that we created earlier,
- In the connection section, set the ingress to only allow internal traffic to protect our service.
- Click Next and enable API if needed.
Code
For the code of our function, we will write it in Go 1.22. The complete code can be found in the cloud-functions folder in the github.com/ganiszulfa/eic-image-recognition repository. Copy function.go and go.mod from that repository to the Cloud Functions and change the entry point to imageLabeling. It’s fairly simple and straightforward code that you can read in a short time. However, there are a few things that you should note:
- The entry point is the function that is executed when the Cloud Function is triggered. In here we set it up to a function that is called
imageLabeling(). - In
imageLabeling(), basically it does 3 things: read the message, call the Vision API, and publish an event message. - in
labelImageWithVisionAi(), you can see how easy it is to have a production ready image recognition to our system.

Click “Deploy” button when you are ready and wait for a few minutes until our function is deployed.
Testing
Now that we have our system ready, it is time to test our code to verify that it is running well. Remember, as mentioned earlier, we are not creating all components in the design. Thus, we should emulate some of the actions.
Emulating User-Service’s actions
Please refer back to our system design architecture in Picture No. 2. There, we can see that User-Service performs three actions when it receives an image. However, we only need to do two things: upload the images to the bucket and send the user-service-new-image message to Pub/Sub.
Uploading images
Go to cloud-storage folder in the github.com/ganiszulfa/eic-image-recognition repository, download the images and upload it directly to your bucket.
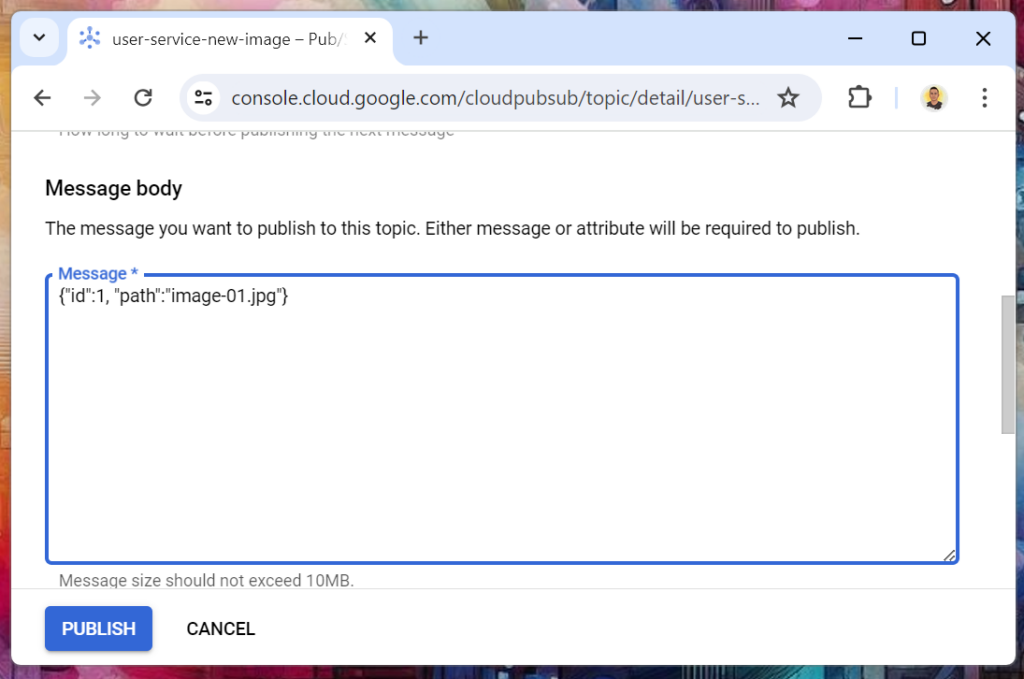
Send messages
Go to Pub/Sub page, and go to the Messages tab (link here). Click “Publish Message” button and a new form will show up from the right side. In the “Message Body”, put {"id": 1, "path": "image-01.jpg"} and click “Publish”. Do this one more time with {"id": 2, "path": "image-02.jpg"} as the body.
Looking at the result
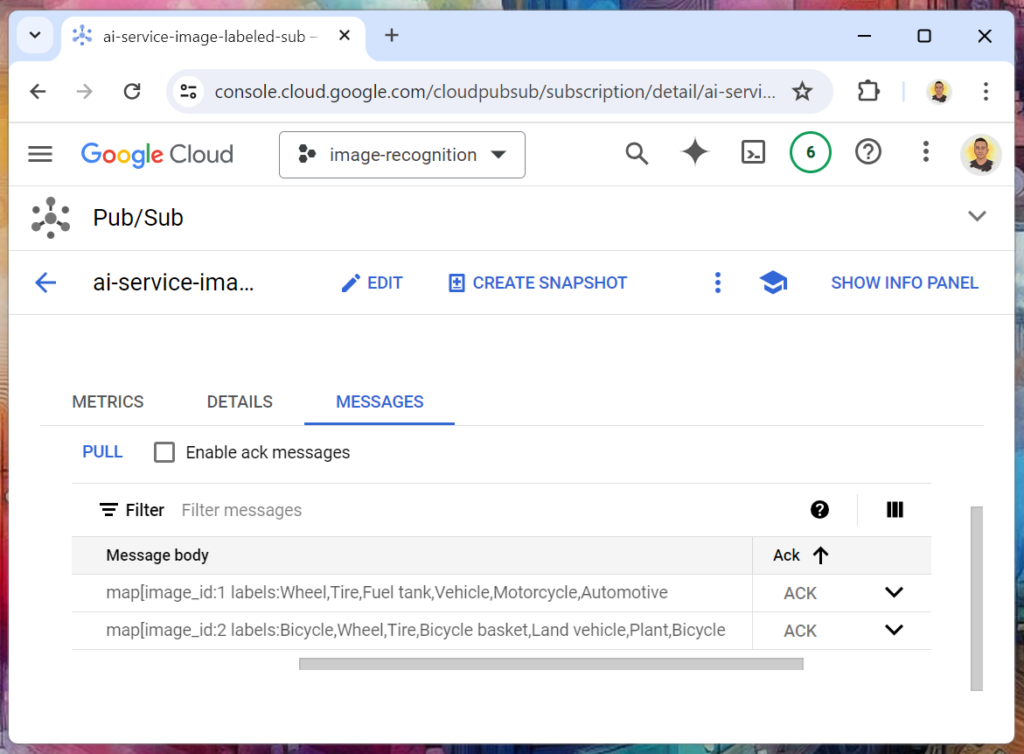
If you recall from our architecture, our AI-Service sends the labeling results to user-service-new-image topic. Therefore, we should go to the messages tab in the user-service-new-image-sub subscription page here. Click the “PULL” button, and you should see two messages from our AI-Service, as depicted in Picture No. 9 below. If you cannot see the messages after a few seconds, please check the logs in Cloud Functions to see if there are errors in the deployment.
User-Service can view the labels when it ingests the message, and if there are no relevant labels, it can take an appropriate response.
Conclusion
Mission success! You can now incorporate an image recognition feature into your application without any knowledge in Machine Learning. As a bonus, the system is fully scalable and can sustain virtually unlimited requests!
Thank you for reading. I appreciate your time and interest. Give it a try and share your results! Also, if you have any comments or questions, feel free to leave a message below. See you on the next posts!